Connect the SATA Data Ports
You have 7 SATA devices:
-
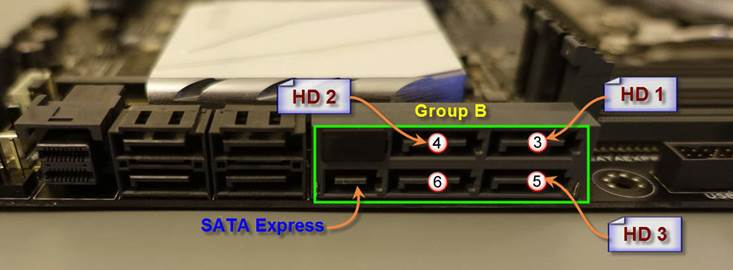
Western Digital Hard Drive HD1
-
Western Digital Hard Drive HD2
-
Western Digital Hard Drive HD3
You would need to connect each device individually to a SATA Data Port on the Motherboard using SATA Data Cables of sufficient length.
In the previous step you had connected the SATA Power Ports to the Power Supply Unit.
Now, you are ready to make the SATA Data Connections to the Motherboard.
This will complete all the connections you would need for this build.
Let’s begin.
Before you start to attach the SATA Data Cables, you must thoroughly explore and understand the SATA Data Ports your Motherboard supports.
All SATA Data Ports are not created equal.
Some support the newer SATA3 bandwidth of 6 Gb/s (Gigabits per second) while others are limited to the older generation SATA 2 bandwidth of 3 Gb/s.
Fortunately, on this Motherboard, all SATA Data Ports support SATA 3 transfer speeds up to 6 Gb/s.
This is one less thing you have to worry about.
Typically you would hook up your fast SSDs to the SATA 3 Data Ports, while leaving the Optical Drives connected to the slower SATA 2 Data Ports on the Motherboard.
You would also look to see if the SATA Ports support RAID configuration for faster and more reliable operation.
Open the User Manual for the Motherboard, and check out the section that explains the Intel X99 Serial ATA (SATA) 6 Gb/s connectors.
It would be easier to follow the schematic diagram in the manual if you refer to the actual picture of the Motherboard below.
The SATA Ports are located along the right edge clustered under 3 groups:
Notice that the SATA Ports under Group A and B are colored gray, while the SATA Ports under Group C are colored black.
What is the significance?
Remember, that colored connectors take precedence.
When the manufacturer places a colored connector, you know they are trying to draw your attention towards it.
It must have something special.
The black SATA Ports under Group C do not support RAID configuration.
So if you were to connect Hard Drives meant for RAID operation, you would use the gray SATA Ports under Group B.
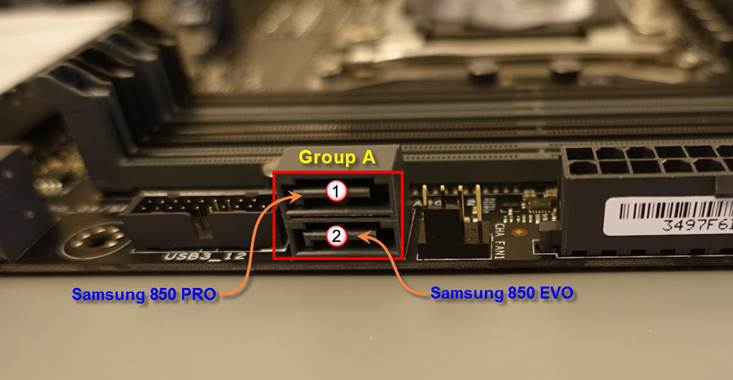
Group A has 2 SATA Ports.
Ideally, you should connect your SSDs to these two SATA Ports first, while using the Group B SATA Ports to connect your Hard Drives that may need RAID configuration.
Here is a close up view of Group A SATA Ports numbered 1 and 2.
Connect the Top Port to your Samsung 850 PRO SSD.
Connect the Bottom Port to your Samsung 850 EVO SSD.
Group B marked in green has 4 SATA Ports and one SATA Express Port.
Connect SATA Port 3 to the Western Digital Hard Disk #1
Connect SATA Port 4 to the Western Digital Hard Disk #2
Connect SATA Port 5 to the Western Digital Hard Disk #3
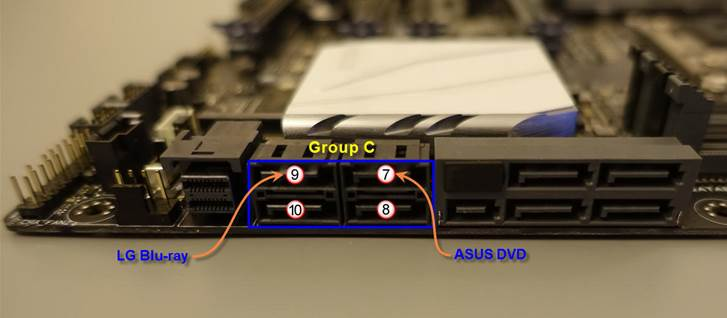
Group C marked in blue has 4 SATA Ports numbered 7, 8, 9, and 10.
Connect the ASUS DVD Burner to SATA Port 7.
Connect the LG Blu-ray Burner to SATA Port 9.
Why not use Ports 7 and 8?
The reason being, it is difficult to attach/detach SATA connectors when they are stacked vertically.
You should always use the SATA Ports on the top row if available.
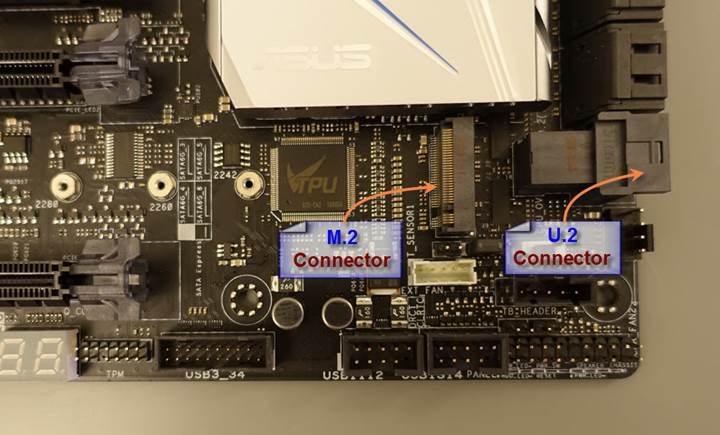
Next to Group C, is the black U.2 connector.
Your Motherboard features both M.2 and U.2 connectors that support a blazingly fast 32 Gb/s bandwidth.
It is meant to connect PCIe 3.0 x4 NVM Express Storage devices which are way faster than standard SSDs.
However, only 1 such device can be active at a time.
In other words, you cannot use both M.2. and U.2 connectors simultaneously.